The Kids Ride Shotgun bike seats allow adventurous mountain biking parents to bring little groms along for the ride. Designed to fit a wide range of bike frames, the Shotgun seat will allow you to share your love of the shred with your little one. Start ’em young and raise ’em right!
This review will cover the original Shotgun seat as well as the upgraded Shotgun 2.0, both of which mount to the top tube of a mountain bike. While these Shotgun seats aren’t easy to swap between bikes, we love that they fit on a wide variety of bike styles and comes in at a very fair price point.
Read our full review below to see if the original Kids Ride Shotgun or the Shotgun 2.0 will work for your MTB adventures, and if the 2.0’s upgraded features make sense for your budget. (The Shotgun PRO seat has no frame contact and is the most expensive of Shotgun’s three offerings. We have the PRO review here.)

Shotgun Original and Shotgun 2.0
Bike Seat Overview

RATING: Highly Recommended (Original Shotgun), Exceptional (Shotgun 2.0)
MSRP: $110 (Original), $190 (2.0)
BEST FOR: Use with aluminum frame bikes. With no straps, kids must be able to sit still and hold on!
MOUNT TYPE: Front mount MTB child bike seat, mounts to top tube of bike frame
WEIGHT LIMIT: 48 lbs. (Original), 60 lbs. (2.0)
PROS:
- Fits on a wide variety of bike frame styles
- Sits lower on the frame than other MTB seats
- Suitable for full suspension or hard tail bikes
- Padded, adjustable saddle
- Keeps a centered weight distribution on the bike
- Allows kids to be front and center and participate in the rides
- Mini-handlebar attachment available
CONS:
- Does not quickly move from one bike to another
- Sits directly on your frame, so not the best option for carbon frame bikes
- Not compatible with e-bikes
How the Shotgun Seat Works – In a Nutshell
Specifically designed to fit mountain bikes (both hardtail and full-suspension bikes), the Original Shotgun and Shotgun 2.0 seats put your little one aged 2 to 5 front and center. By placing kids about mid-way along the bike’s top tube, you’re able to maintain an overall centered weight distribution on the bike.

The Shotgun Original and Shotgun 2.0 seats rest directly on your top tube and are secured tightly to your frame with a quick-release skewer between the seat’s legs and a skewer between the foot pegs. The padded saddle rotates forward or back so that it can remain horizontal, no matter the angle of your top tube.

Textured metal foot pegs and flexible rubber foot straps provide a secure place for little ones to rest their feet. Optional (and adorable) mini handlebars ($49) can be mounted to your own handlebars for kids to rest their hands (and keep them off your handlebars!).

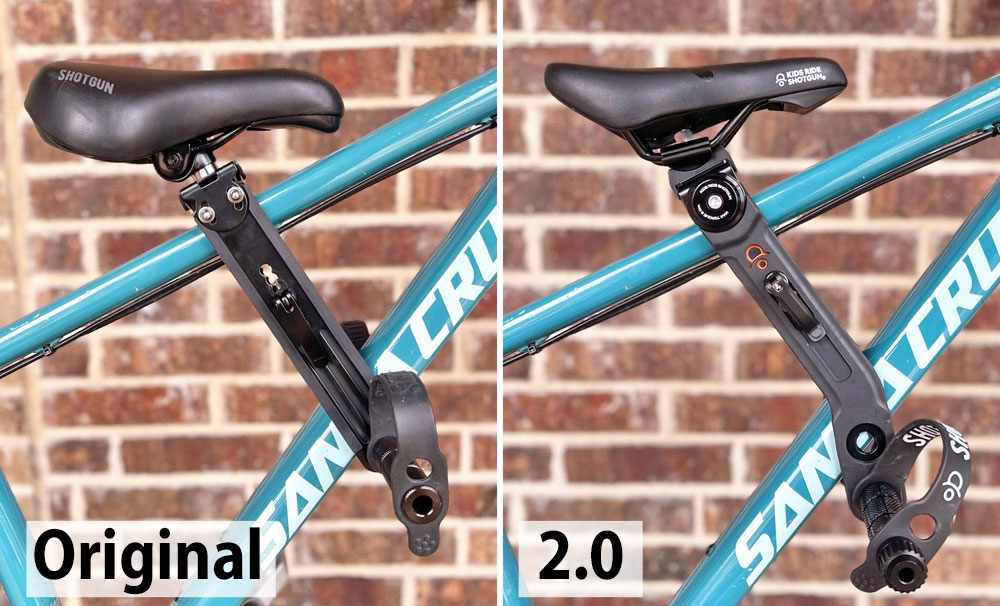
Shotgun Original vs. Shotgun 2.0
The Shotgun 2.0 is an upgraded take on the Original Shotgun, with a mid-range price point between the $110 Original and the $275 Pro. In this review we will focus on how the Original and 2.0 are different, and how those differences play out in real life.
NOTE: The Shotgun Original now has a saddle that looks very similar to the Shotgun 2.0.
| Shotgun Original | Shotgun 2.0 | Shotgun Pro | |
|---|---|---|---|
| Price | $110 | $190 | $275 |
| Frame Contact | Yes | Yes | No |
| Weight Limit | 48 lbs. | 60 lbs. | 60 lbs. |
| On and Off | 2 to 5 minutes | Quick release - 30 seconds | Quick release - 30 seconds |
| Footpegs | 1 setting | 2 height settings | 7 small increments |
| Saddle | Semi Padded | Semi padded | Same as 2.0 |
Getting the Seat On and Off: The simpler and quicker method for getting the Shotgun 2.0 on and off your bike is the major benefit of the 2.0 over the Original Shotgun. We’ll go into more detail about this process later in the review, but the 2.0 takes about 30 seconds to put on or take off. The Original seat takes 2 to 5 minutes.
Weight Limit: The higher 60 pound weight limit of the 2.0 will come in handy if you plan on riding with your kids until they are 4 or 5. We still love taking our 5-year-old (47.5″ tall, 54 lb.) daughter for casual rides around the neighborhood on the Shotgun, but at her size we would never ride with this set-up on true trails. (She currently rides a 20″ MTB.)
Foot peg Settings: The Original Shotgun has only one setting for the foot pegs where kids rest their feet. The 2.0 has two settings so that the foot pegs can be adjusted lower as your child grows.
Saddle: The saddle of the original version of the Original Shotgun was thickly padded and offered more cushioning than any other MTB seat on the market. The Shotgun 2.0 seat is also padded, but less so. The updated Original saddle looks very similar to the 2.0 saddle, but we have not tested this version.
Shotgun Bike Seat Review – Results of our Test Rides
As a dad of 4 kids, I understand the struggle of having a passion for mountain biking vs. being a responsible parent and taking care of the kids. There used to be limited time to get out on my bike. I had what I would call “the window” and I would rush as fast as I could to get a quick ride in.
As my kids got older and could ride with me, there became more “windows” to go riding, but there was still conflict because the younger kids would get jealous that they couldn’t come. Now with kids’ bike seats that are designed specifically for mountain biking, like the Shotgun seat, I can get a ride in and at the same time become Superdad! These mountain bike kids seats are definitely a game-changer for parents!

Parent and Child Fit on Shotgun Original and 2.0
While not everyone will love that the Shotgun Original and 2.0 seats rest on your bike’s frame (carbon-framers, we see you!), there is a definite advantage to this set-up. Of the four major MTB kids seats, the Shotgun Original and Shotgun 2.0 both sit considerably lower than the Shotgun Pro, but just slightly lower than the Mac Ride on the bikes we’ve tested them on.
With a less “puffy” saddle on the 2.0, the 2.0 sits just a tad lower than the Original. Below you can see a comparison of how high each of the Shotgun seats sit compared to an adult saddle.
NOTE: With the Original saddle now in the same style of the 2.0, we assume they would sit the same distance below the adult saddle. We have not yet tested the new Original saddle.

Why is a Lower-Set Seat Beneficial?
A lower-set seat makes for a better fit as your kids grow older and taller. In the image below, you can see how this plays out in real life with a tall 3.5-year-old. The Original Shotgun or 2.0 (frame-mounted) is a better fit for parents who plan on using the seat until their child is 4 years or older.

A lower kids’ seat is also helpful for shorter parents with average sized kids. Riding with a child’s helmet hitting your chin isn’t the most pleasant experience, and makes downhill riding with a lowered saddle more difficult.
At the end of the day, there is pretty minimal difference between the Shotgun Original, Shotgun 2.0, and Mac Ride as far as how high the seat sits above your frame. We wouldn’t make our purchase decision based on this. But if you’re considering the Shotgun PRO and you are short or want to use the seat with taller/older kids, the Original Shotgun or Shotgun 2.0 will probably be a better riding experience for you.
Seat Placement on Bike Frame
With placement on a sloping top tube, the height of the Shotgun’s saddle will be lower the closer you position it to your own saddle, and higher the closer you place it to your head tube.
Where you decide to position the Shotgun will depend on your bike’s frame design, as well as choosing a spot that allows your child to comfortably reach your handlebars (or the optional Shotgun handlebars) while still maintaining enough clearance between their feet and the front tire.
Features of the Shotgun Original vs. Shotgun 2.0
The Shotgun Original and Shotgun 2.0 are quite similar, but do differ in some subtle and some important ways.
Footrests
The Original Shotgun and 2.0 feature textured metal foot pegs with rubber foot straps. The Original seat has just one setting for the foot pegs, while the 2.0 has a higher and lower setting. Due to the higher weight limit of the 2.0, we appreciate that we can lower the foot pegs to accommodate for longer legs as kids grow.
Optional Mini Handlebars
Kids Ride Shotgun offers three different mini handlebar options, one for each model of Shotgun seat. While you can purchase the handlebars and seat as a kit, the handlebars are also sold separately if you prefer a style of handlebar that isn’t the same style as your seat.

Original Shotgun Handlebars ($39): Allen key required to remove between rides. Takes about 2 minutes to take off or put on.
Shotgun 2.0 Handlebars ($49): Same basic design at the Original, but the grips feature a different pattern and are slightly more narrow in diameter for little hands.
Shotgun Pro Handlebars ($79): Quick release attachment to handlebars – no tools required. Mini bars are slightly wider for a more MTB-stance for the littles.
We have used all three mini handlebar options, and each one does a great job. If you want to take the handlebars on and off your bike frequently, the quick-release feature of the Pro handlebars is very worth the upgrade.
If you don’t mind having the bars live on your bike most of the time (or spending a couple minutes with an Allen key to remove them between rides), the Original Shotgun bars work well and we don’t see much reason to upgrade to the 2.0 bars.

Saddle
The original Original Shotgun had a super plush and comfy saddle. The 2.0 saddle is flatter and less padded, but does have a more traditional MTB swagger to it. The most updated Original Shotgun now has a saddle that looks very similar to the 2.0. The image below shows the original Original saddle.

Considering many kids riding on a Shotgun seat will still be in diapers, the added padding of the old Original wasn’t much of a benefit until they were potty trained. Even then, our kid testers have never complained about the saddle, not even on a 12 mile downhill ride on the MacRide seat that doesn’t have any padding at all. Your bike’s suspension system is probably a bigger comfort factor.
On and Off the Bike – Simplified for 2.0
The biggest difference between the Shotgun Original and Shotgun 2.0 is the method for getting the seat on and off your bike. The Original is more complicated and takes longer.
Getting the 2.0 on and off your bike (after initial installation) is very streamlined, simple, and fast. This is the big reason you would spend $80 extra to upgrade to the 2.0.
Removing the Original or 2.0 Shotgun seat from your bike (or re-attaching) requires you to remove both the quick release skewer from between the legs, as well as remove the skewer between the foot pegs – both of these processes take longer on the Original, but the biggest difference is with the foot pegs.
NOTE: The Shotgun Pro seat is quite different, and does not mount to your bike frame. There are pros and cons to that set-up, which you can read in our review of that MTB seat. The 2.0 is just about as easy (if not easier) to get on and off your bike as the Pro seat.
Original Shotgun – On or Off in 2 to 3 Minutes
Removing the foot pegs on the Original requires you to:
1. Unscrew and remove the right and left foot pegs from the threaded skewer (see left arrow below)
2. Move both threaded washers towards the center of the threaded skewer (see right arrow below)
3. Remove the skewer from between the Shotgun’s legs

Shotgun 2.0 – On or Off in 30 seconds
Removing the foot pegs on the 2.0 requires you to:
1. Loosen the dial at the end of the foot peg for the right foot – 5 to 10 turns (see left arrow below)
2. Push the orange button at the end of the foot peg for the left foot (see right arrow below)
3. Remove the skewer (foot pegs stay in place)

Initial Assembly – Make Sure to Read the Details!
While no-frame-contact seats like the Shotgun Pro and Mac Ride come basically assembled right out of the box, the Shotgun Original and Shotgun 2.0 require a bit of assembly. Because every bike frame is different and these seats sit on the frame, you have to make several adjustments to make the Shotgun fit your specific bike. Tweaking these settings to get them just right can take a bit of time.
The instruction booklets are very detailed, but if you actually take the time to read everything in them, you won’t have a problem getting your Shotgun seat set up correctly. If you try to skim the instructions, you’re likely to mess something up. There are also very helpful assembly videos that we highly recommend watching!
So what adjustments have to be made?
1. The width of the seat’s legs (directly under the saddle) so they hug your top tube
2. The angle of the saddle so it sits parallel with the ground
3. The angle of the legs to accommodate the angle of your down tube, and also provide enough clearance between your child’s feet and the front tire.
All of these adjustments require tools and time, which makes frequent or mid-trail swapping of the Shotgun (both models) between bikes impractical.
IMPORTANT INSTALLATION NOTE FOR THE ORIGINAL SHOTGUN: If your down tube is wider than your top tube, the metal legs will bow out and bend as you screw on the foot pegs at the bottom of the legs. This is normal. We initially thought we had ruined our seat by bending those legs, but we verified with Kids Ride Shotgun that this should be expected. We did not experience this on the 2.0.
One small item we would like to see included is a small piece of rubber to go between the underside of the downtube and the skewer that the foot pegs attach to. The size of the frame of one of our bikes has that piece just touching the frame. (But this isn’t the case for all bikes.)
There is ample coverage for frame protection on all other frame contact points. To solve this problem, you could just add a small piece of heli tape or even a small piece of rubber you have lying around.

Shotgun Seats (Frame Mount) vs. Shotgun Pro (No Frame Contact)
Now that we’ve covered the differences between the Original Shotgun and Shotgun 2.0 frame-mounted seats, are you still curious if the no-frame-contact Shotgun Pro might be worth the upgrade for you? While no frame contact is certainly nice, it’s not the best option for everyone.
A few reasons the Original Shotgun and 2.0 may be a better option for you:
STACK HEIGHT: One reason to choose a frame-mounted seat could have to do with the stack height of your bike. The Shotgun Pro (and Mac Ride) rely on having enough room to remove a headset spacer. If you don’t have that room, it may not be compatible.
DROPPER POSTS: Another reason to choose the Shotgun or 2.0 has to do with dropper posts. For mounting a Shotgun Pro (or Mac Ride) to the seat post, your dropper post has to have 2 cm of exposed space between the seat collar and the dropper seal.
If your dropper is slammed all the way to your seat collar, you can’t mount the Pro. (Unless you have enough dropper cable length to raise the dropper post out of the seat tube.) In our fleet of eight mountain bikes of our parent testers, we have two bikes that don’t have enough space here.
SIT LOWER COMPARED TO THE ADULT SADDLE: The Shotgun Pro sits much higher than the Original Shotgun and Shotgun 2.0. For shorter parents or taller kids, the lower-set, frame-mount seats have an advantage.
A few reasons the Shotgun PRO may be a better option:
EASILY SWITCH FROM BIKE TO BIKE: If you install the headset spacer on two different bikes, the Shotgun PRO can easily be swapped between bikes.
With the Original Shotgun and Shotgun 2.0, the seat has to be properly adjusted to fit each bike. While this process doesn’t take long, it does take about 10 minutes to remove and then set up on another bike (after practice). As a result, swapping the frame-mounted Shotguns from bike to bike on a regular basis would be much more work than with the Pro.
FOOTRESTS MOST ADJUSTABLE: The Pro has seven different foot peg heights set at small intervals. This allows you to be more precise for your child’s comfort, but is a minor benefit. They are also much easier to adjust than the 2.0’s.
EBIKE COMPATIBLE: The Shotgun Pro is the only Shotgun seat that can be adjusted wide enough for use with an ebike.
Bottom Line on the Original Shotgun Seat and Shotgun 2.0
Riding with the Shotgun seats has brought so many giggles, laughs, and weeeees to our family bike rides. We’ve tried all the ways of bringing your kid on a ride with you (bike trailers, Wehoo Turbo, etc.), but there’s just something about having the child being on your bike and holding the bars that gives you both a more involved, connected experience. It also makes them feel like they are the one in control!
If you have a passion for riding bikes, you’ll love sharing rides with your child. It’s a pretty unique bonding experience and will give your young one a taste of what mountain biking really feels like. It will also help give them confidence as they are learning how to ride their own bike.
The Shotgun seat is definitely a great option, especially if you are using a dropper post that is fully inserted into the seatpost.
Check out this video from Shotgun that shows how much fun the ride can be for parents and kids!
FTC Disclosure: Affiliate links are included in this review. No monetary compensation was provided for this review, however, the reviewed product was supplied by the manufacturer or distributor to help facilitate this review. All opinions and images are that of Two Wheeling Tots LLC. All content and images are copyrighted and should not be used or replicated in any way. View our Terms of Use.