Burley Ski Kit Review
Do you have a Burley multi-sport trailer? Do you live in an area with snow? Then consider buying yourself a Burley Ski Kit! This is an incredible tool for parents to not only tolerate winter, but enjoy the outdoors with their kiddos all year long regardless of the cold.
Don’t ski? No problem! Learning to nordic ski or cross country ski is relatively easy, especially on flat terrain. It is a great cardio workout and your kid(s) will be tucked away warmly and safely in their Burley trailer.
Prefer using the Burley trailer ski attachment for fat biking or snowshoeing? We’ve done that too! Learn more about all these activities in our review below.
Burley Ski Kit Overview

RATING: Highly Recommended
MSRP: $289
BEST FOR: Cross-country skiing, fat biking, and snowshoeing
PROS:
- Can be used for skiing, fat biking, hiking, or snowshoeing
- Skis glide effortlessly along snowy terrain
- Trailer keeps kids much warmer in cold temperatures vs. using hiking carriers or towing kids behind in sleds
- Better priced ski trailer in comparison to other brands
- An easier ski trailer to transport compared to other brands
CONS:
- A slight bob when towing, due to the design of the waist harness
- Exaggerated forward lean when the trailer is stopped, forcing the child forward
Purchasing Note
We recommend purchasing your ski kit now or in the off season before winter hits. Burley Ski Kits were in high demand last winter and were a hard item to get your hands on! See Burley’s website for a full list of trailers compatible with the current ski kit.
Burley Ski Kit – Getting Started
The Burley Ski Kit comes with five separate pieces that are easy to install and can be put together in a matter of minutes with some practice.
What’s included?

Skis
There are two lightweight skis that will insert where your trailer tires insert. The skis easily glide into the wheel axle with Burley’s push button system.
Tow Bars
Next are the two aluminum tow bars that are adjustable to different lengths, typically based off your height and ski length. The tow bars will be inserted in the front receivers of the trailer.
Waist Harness
Your waist harness will come detached from the tow bars. Be sure to secure your tow bars and harness correctly, otherwise you may lose power efficiency when towing your trailer.
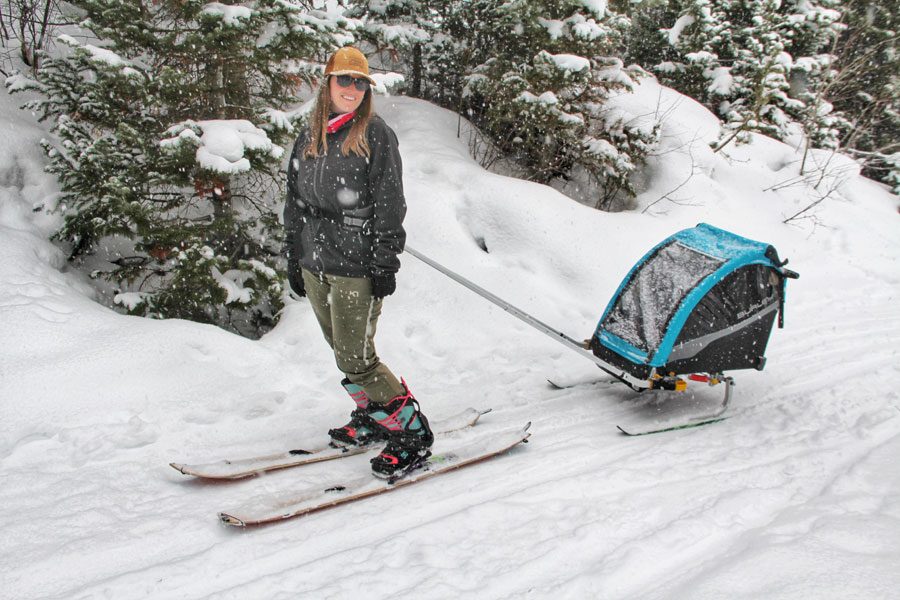
Cross-Country (Nordic) Skiing with your Burley Ski Kit
The most obvious use for the Burley Ski Kit is skiing. These ski trailers are intended for nordic skiing, otherwise known as cross country or skate skiing.
We, however, use our Burley Ski trailer with a different kind of touring ski known as backcountry skis. Backcountry skis combine nordic skiing and downhill or alpine skiing. The heels of the ski binding release in order to ski tour and then can also lock in place for downhill skiing.
Sometimes we use our backcountry skis and ski trailer on your typical nordic skiing groomed trails, or sometimes we find forest roads closed for winter and ski up and then ski down giving us a more downhill ski feel.
Just know you have options regardless of what touring ski you are using. If you are new to nordic skiing, rent some cross country skis locally and give it a go. Anyone can pick up cross country skiing, especially on flat, mellow terrain!
Performance while Skiing

Overall the performance of the Burley Ski Kit was awesome, especially for the price point of $290! While some may feel that is a steep price to pay in addition to your trailer, compared to its competitor Thule ($350 for the Thule Chariot ski kit), it is a great price!
Then also accounting for the cost of your trailer in addition to the ski kit, Burley still wins and gets you out skiing (trailer + ski kit) for much cheaper.
The cheapest double Thule Chariot trailer that is compatible with their ski kit is the Thule Chariot Lite priced at $1,000. Then add on the ski kit for a grand total of $1,350. That is a steep price to pay.
For families on a budget, the Burley is a much more affordable option. Burley’s cheapest compatible trailer is the double Encore X priced at $650. Adding in the $280 Burley ski kit, they will get you out skiing for a grand total of $930!
So in terms of price, Burley is significantly cheaper and more cost effective for families.
Ski Kit Set-Up

Skis
The skis insert into the body of the trailer where the wheels would normally go. They lock in place simply by pushing them all the way into the axle. To remove them, push the center axle button and pull them out. Incredibly easy.
Tow Bars
The tow bars will be inserted in the front receivers where you would normally put the tow arm for bike trailer mode, or the jogger wheel arms. It doesn’t matter which tow bar goes in which receiver.
The tow bars will click into place. It may take some finagling your first go around. Just remember that your tow bars are in the right position if you only see the black rubber end poking out of the receivers. Then insert the retaining pin(s) based on your model of Burley.
Padded Hip Harness

To attach the harness to the tow bars, you will want to identify the loop on the waist harness that is aligned with the middle of your hips. Pull the loop through the eyelet of the tow bar.
Then take your retaining pin attached to the waist harness and slide it through the loop to secure the tow bars to the harness. We watched Burley’s instructional video on this, and it was a huge help.
Burley’s website shows attaching your waist harness to the tow bars after the tow bars are inserted into the front receivers. This would mean you would repeat this step every time you hit the trails.
In our experience, it’s easier to attach your waist harness to the tow bars first thing, then store and transport with the harness attached to the tow bars. This makes packing, set-up, and take down a whole lot easier and is one less thing to think about.
Pro Tip for Skiing with your Burley Ski Kit (or ANY Ski Kit)
After hundreds of hours using ski kits, we recommend wearing the waist harness backwards, with the padding on your stomach rather than your back. For many other moms we know, it is more comfortable and feels more supportive while towing. Try it and see how you like it!
Differences Between Thule Chariot and Burley Ski Kit
You may wonder why the Thule ski kit is $125 more? What are you missing out on? We did notice a few small differences worth mentioning when using the Burley ski attachment, but none compromise the integrity or safety of your skiing experience.
Waist Harness and Tow Bars
Due to the construction of the Burley waist harness, there is a slight bob when towing. The bob comes from the keyhole of the tow bars slightly shifting in the harness as you move.
If you have never used another ski kit or ski trailer you probably wouldn’t notice. For us avid trailer testers, we did notice. But rest assured it is only a slight bob and is more pronounced when skiing at a faster pace. On steeper inclines and at slower speeds it was not as noticeable.
If you are a high performance nordic skier who has yet to pick out a multi-sport trailer, then you may want to consider a Thule Chariot trailer and their ski kit. Their harness is constructed differently to eliminate this issue.
However, if you already have your Burley trailer, are on a budget, are a novice nordic skier, or you are not bugged by a slight loss in performance, then the Burley Ski Kit is absolutely worth the investment.
Trailer Lean When Not in Ski Mode

The Burley trailer has a more aggressive forward lean when in the neutral position or not being towed. This is relevant during setup, take down, making adjustments on the trail, break/snack time, or any other time you find yourself stopping, taking your waist harness off, and resting the front of the trailer on the ground.
This does NOT affect the trailer or child’s position when you are actively skiing, biking, running, or doing any activity with your Burley.
The forward lean pushes the child into a slightly uncomfortable position when you stop and set the trailer down. To prevent that dramatic leaning forward, we recommend adjusting your child’s seat to be in the most reclined position while skiing. (This is possible in the D’Lite X and Cub X models, but not the Encore X.)
This in no way affects the performance of towing the ski trailer, just a slight inconvenience when stopped.
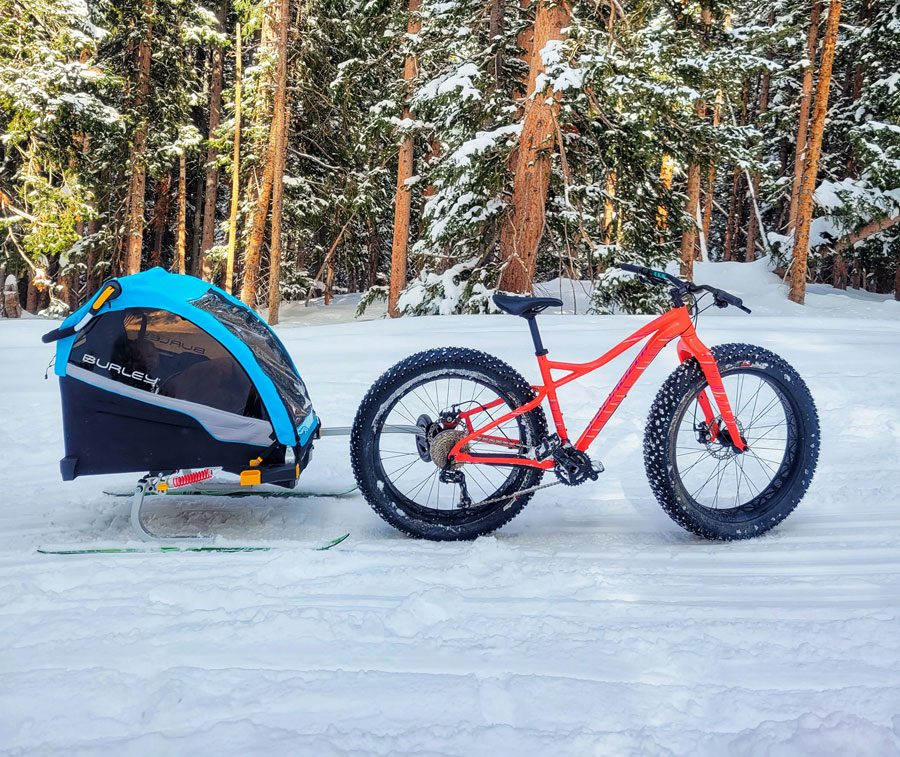
Ski Position on The Trailer
One of the first things we noticed with the Burley Ski Kit was how easily we could fit our trailer with the skis attached in our car. We realized that Burley has their skis tucked under their trailer more than the Thule Chariot.

Burley’s skis stick out about 2.5 inches from the exterior wall of the trailer while Thule’s skis stick out 4+ inches from the exterior wall of the trailer.
While we loved this for transporting, the Burley trailer is supported by a more narrow base when skiing. While we could not identify any issues or problems with Burley’s vs. Thule’s design, from a personal standpoint we prefer the wider base and support that Thule’s Ski Kit provides.
However, others may argue that Burley’s Ski Kit would be more maneuverable in tight spaces and is more transportable. So while this is not a performance issue per se, it is a noticeable difference that we wanted to point out.
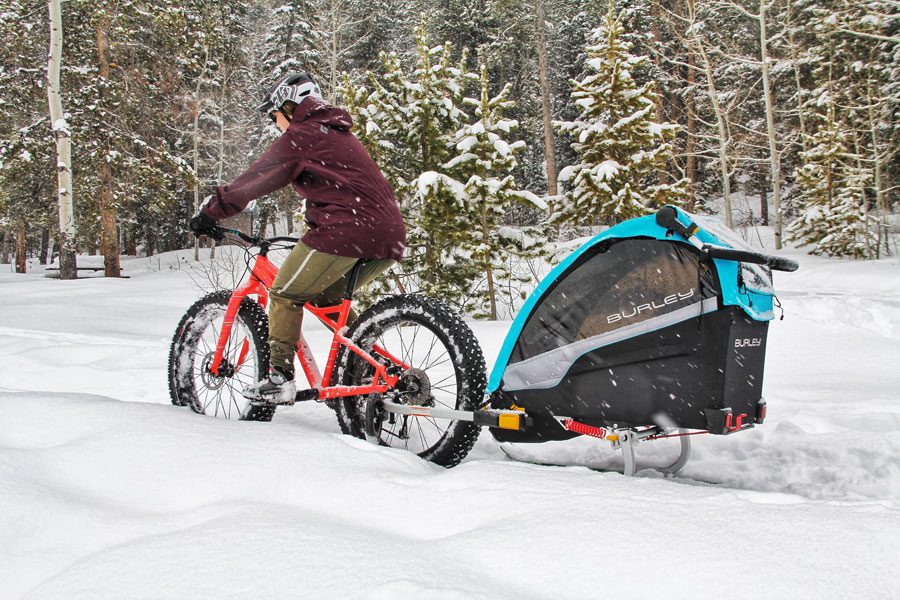
Fat Biking with your Burley Ski Kit
There are ways you can use your Burley Ski Kit other than skiing. Our personal favorite is FAT BIKING!
Ditch your tow bars and harness for your bike trailer hitch attachment. Depending on your fat bike make and model, you may have to order a separate thru axle adapter. We have been able to find thru axles for our fat bikes at the Robert Thru Axle Project.
When fat biking, your ski trailer glides efficiently behind you on snow packed trails. Most groomed fat biking trails are wide enough for a trailer, especially a single trailer. But we have even made groomed trails work with a double trailer.
You can also use unmaintained winter roads or groomed Nordic Skiing trails that allow fat bikes. Our favorite is unmaintained winter roads and fat biking specific groomed trails, both of which we can find close to our home in Salt Lake City, Utah.
Fat Biking Comparison: Ski Kit vs. Burley Fat Tires

Burley makes a separate 16+ wheel kit (fat tires) for their trailers, which is unique to Burley. We compared using the fat tires on our trailer while fat biking to using the skis of the ski kit. I was absolutely sure that the ski kit would outperform the fat tires as we have dedicated so many miles to fat biking with our ski trailers.

We were shocked to find the fat tires actually performed extremely well while fat biking and exceeded our expectations! In fact, on well-groomed fat biking trails I would forget if I was towing my trailer with skis or the fat tires. The fat tires also performed well in light powder of 1-2 inches, as long as it was below freezing.
In deeper snow and soft conditions the skis typically performed better. My own fat bike struggles in deep snow and especially when warm, so it only makes sense that the skis would be more optimal in those conditions.
Our conclusion is if you only want to fat bike with your trailer in the winter (not ski), then it’s worth considering purchasing the fat tires instead of the ski kit. It is cheaper and has its own versatility to be used all year long!
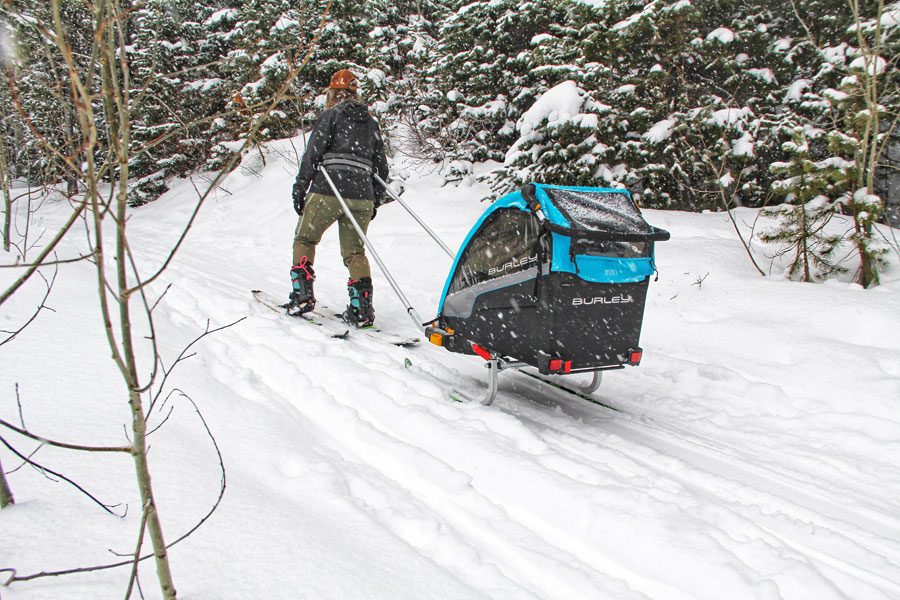
What about Snowshoeing with the Ski Kit?
You can absolutely snowshoe with your ski kit. However, snowshoeing with a trailer will limit the trails you can traverse. If your type of snowshoeing is paving a path through deep powder and straight up a mountain, then the ski trailer isn’t going to be a great option.
Single track, steep grades, and deep powder would be difficult to navigate with a trailer. You typically would want to traverse groomed trails, wide trails, forest roads etc. But there are plenty of areas that snowshoers frequent in the wintertime that would be great for using your ski kit.
Transporting and Set Up of your Burley Ski Kit
Parents should keep in mind that there is a lot of effort involved in using a ski trailer – not with set-up particularly, but with the overall logistics. It is a lot of gear to pack, unpack, and pack up again.
You will need your trailer, the trailer skis, the waist harness and tow bars, your skis, your poles, your winter layers, your child’s winter layers, snacks, water, and of course your child. That’s a lot!
Then depending on where you use your ski trailer, you may have to unpack and walk the gear to the trailhead and set up, instead of unloading and setting up at your parked car. Why, you may ask?
Well unless there is snowpack from your car to the trail you won’t want to grind your trailer’s skis on gravel, cement, or pavement when going from your car to the trailhead.
A hack is bringing your trailer tires along. You can then load your child from the car, throw your skis in the trailer, attach the waist harness and tow bars, and pull your trailer through the parking lot on its wheels.
Once at the trailhead, swap out your tires for your skis. You will then have to haul your tires during your ski tour, but in some situations this is much easier than trying to haul the gear by hand to the trailhead.
I am able to fit my collapsed single D’Lite X trailer with the skis attached in the back of my Subaru Outback. This saves time, energy, and simplifies the setup process at the trailhead.
For those parents intimidated by the setup, practice at home first and pick areas where you can park next to the trailhead or snowpack leading to the trail. As you practice, you will also find shortcuts and ways to simplify your ski outings. The reward of getting out in the winter far outweighs the trouble of the time spent packing, loading, and unloading.
Keeping Your Kids Warm and Comfy

Have we discussed the added bonus of warmth and comfort for your kiddos? Are you someone that would worry that your kid, toddler, or baby would be too cold in temperatures below freezing for several hours? Well, don’t be if they are snug inside Burley’s multi-sport trailers!
Utilize the rain cover and your kid will stay nice and toasty. In fact, most days my kid refuses to wear a beanie or gloves. I typically only dress him in a fleece lined polyester base layer and a fleece midlayer, even when temperatures are in the teens.
The rain cover traps the warm air inside. You can also add a blanket for added insulation and warmth. We love using a compact synthetic down blanket. The rain cover also does its job when caught in a snowstorm. You won’t find any water leaking through and dripping on your kids or valuables.
Bottom Line on the Burley Ski Kit

Overall the Burley Ski Kit is an incredible product, especially for those parents who already have a Burley multisport trailer or those on a budget who don’t want to spend over $1,000 to ski with their kids!
You will love the versatility of utilizing your trailer in the winter months with Burley’s Ski Kit, allowing you to get exercise and time outside while your kids are safe and comfortably tucked away in your Burley trailer.
Avalanche Danger
Before you go… we want to touch on avalanche danger! Avalanches will be prevalent anywhere there is snow and slopes. It is important to be informed on the risk of avalanches in your area.
If you are unsure about the potential dangers, utilize the National Avalanche Center’s website to find out if your area has a local avalanche forecaster that will provide forecasts, reports and training. Be informed and know before you go!
FTC Disclosure: Affiliate links are included in this review. No monetary compensation was provided for this review, however, the reviewed product was supplied by the manufacturer or distributor to help facilitate this review. All opinions and images are that of Two Wheeling Tots LLC. All content and images are copyrighted and should not be used or replicated in any way. View our Terms of Use.