Incredibly easy to install and uninstall from your vehicle, the Yakima Ridgeback bike rack makes going out for spur of the moment rides a breeze. Its unique tie-down system is super efficient for some bike set-ups, but kind of a pain for others. Read the review below for all the details of our test rides!
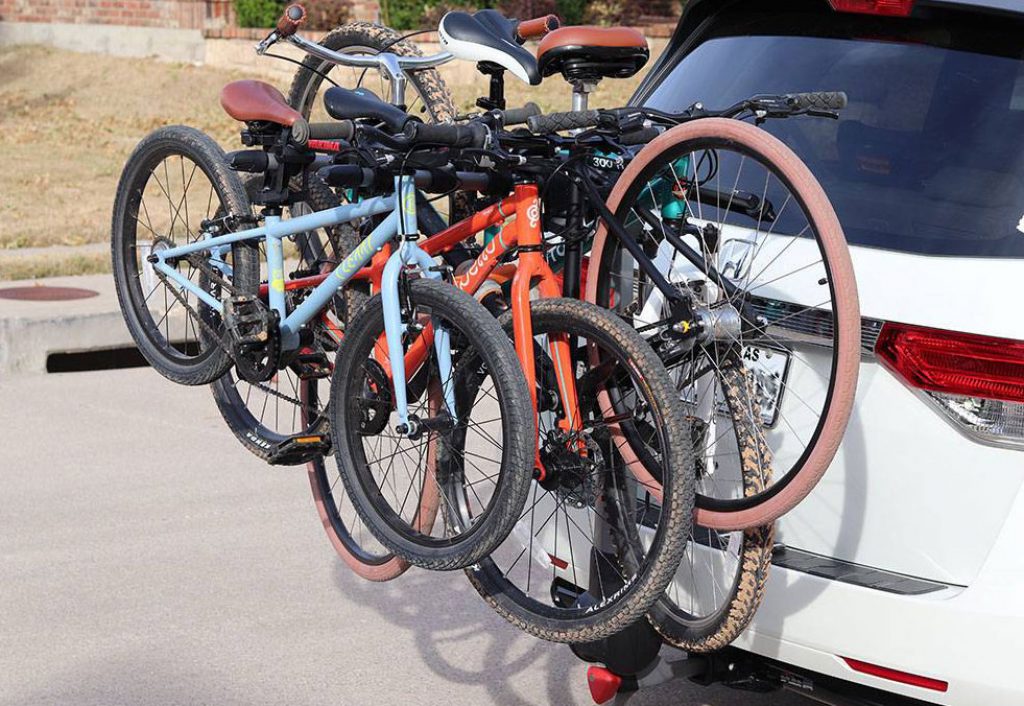
Yakima Ridgeback Bike Rack Overview

RATING: Recommended
MSRP: $319
BEST FOR: Bikes with flat top tubes.
CAPACITY: 2, 4, or 5
HITCH SIZE: 1.25″ or 2″
WEIGHT: 35.6 lb.
FITS 20″ BIKES: Yes
PROS:
- Incredibly easy & quick to install and to remove from car
- Lightweight
- Takes up very little storage space when not in use
- Great quality materials used – solid and durable for years of use
CONS:
- Bikes are spaced closely together; high potential for damage
- Lengthy loading process with 2+ bikes
- Zip-Strips are not flexible and use with women’s and kid’s bikes can be problematic
- 5 bike rack can only hold 4 bikes
Yakima Ridgeback Hitch Bike Rack: What Makes it Stand Out
The Yakima RidgeBack bike rack is a hitch mounted bike rack that is convenient enough to use on a daily basis to get to your local riding destinations, yet heavy duty enough to confidently take long distances for major biking adventures.
If you’re hauling bikes with a standard horizontal top tube, the removable tie down system (called Zip-Strips) makes it much quicker and easier to load bikes onto the rack than traditional threaded-buckle tie-downs.
The bikes glide smoothly over the arms and the Zip-Strips are quickly and easily put into place. However, if you have multiple bikes with sloping down tubes or smaller frames, this might not be your best option for a hitch rack.
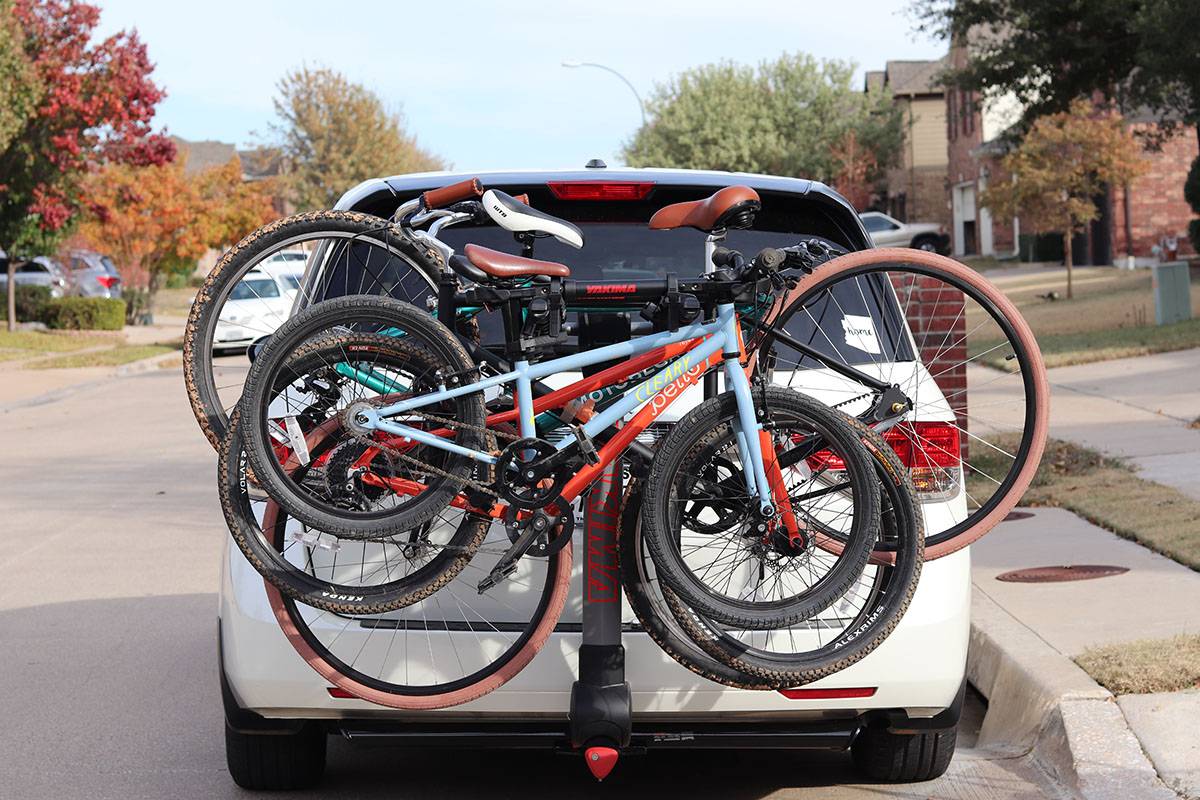
Who It’s Best For
- Families who are looking for hitch rack system to use with standard, road, and hybrid adult bikes, as well as 20″+ kids’ bikes (kids’ bikes have limitations, see below)
- People needing a lightweight rack they can easily take on or off the car without any help
- Families looking for a bike transportation solution for both long and short distances
Who It’s Not Best For
- Cyclists with expensive bikes who are worried about damage to the bike when loading/unloading
- Families needing to carry more than 4 bikes
- Families who will consistently be carrying more than one women’s or kid’s bike (see more below under Zip Strips)
Why a Hanging Rack?
Hanging racks make it possible to just get out and go. The other day my family was invited to go biking about 15 miles out of town. Three minutes later I had installed the Yakima Ridgeback on the back of my minivan (by myself!) and was ready to load bikes onto it. With a tray rack like the Yakima Hold-Up EVO, it’s usually a two-person job to install onto a car because they are much bulkier and significantly heavier.
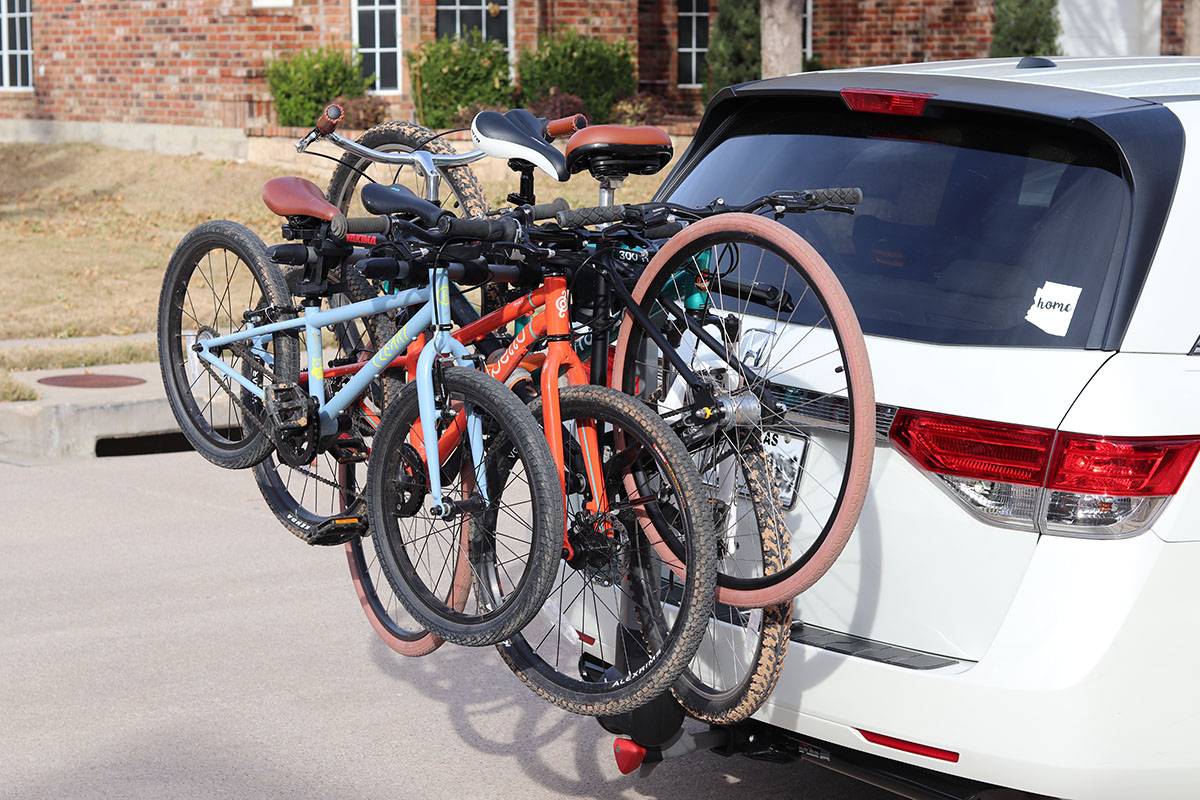
Hanging racks are just simple. I want a system that doesn’t add bulk to my vehicle if I have to leave it on, and I want it to take up little space when I store it in my garage.
The Yakima RidgeBack weighs less than my three-year-old and it’s easier to take on and off my car than it is to get her buckled into her car seat. The RidgeBack is light enough and compact enough to take off and put on your vehicle daily, if necessary.
And for many families, the most important feature about hanging racks is that they are much more affordable than tray racks!
How the Ridgeback Bike Rack Works
For this review, we used the Yakima RidgeBack 5-bike model, but the functionality is the same for their 2 & 4-bike models as well. The rack comes fully assembled and ready to install on the vehicle.
I love getting new gear, but when I have to follow instructions to put it together I lose some of my enthusiasm. So being able to go from the box straight onto my car was a huge bonus. It comes ready for a 2″ hitch receiver, but can quickly and easily adapt to a 1.25″ receiver by removing a small piece on the receiver arm.
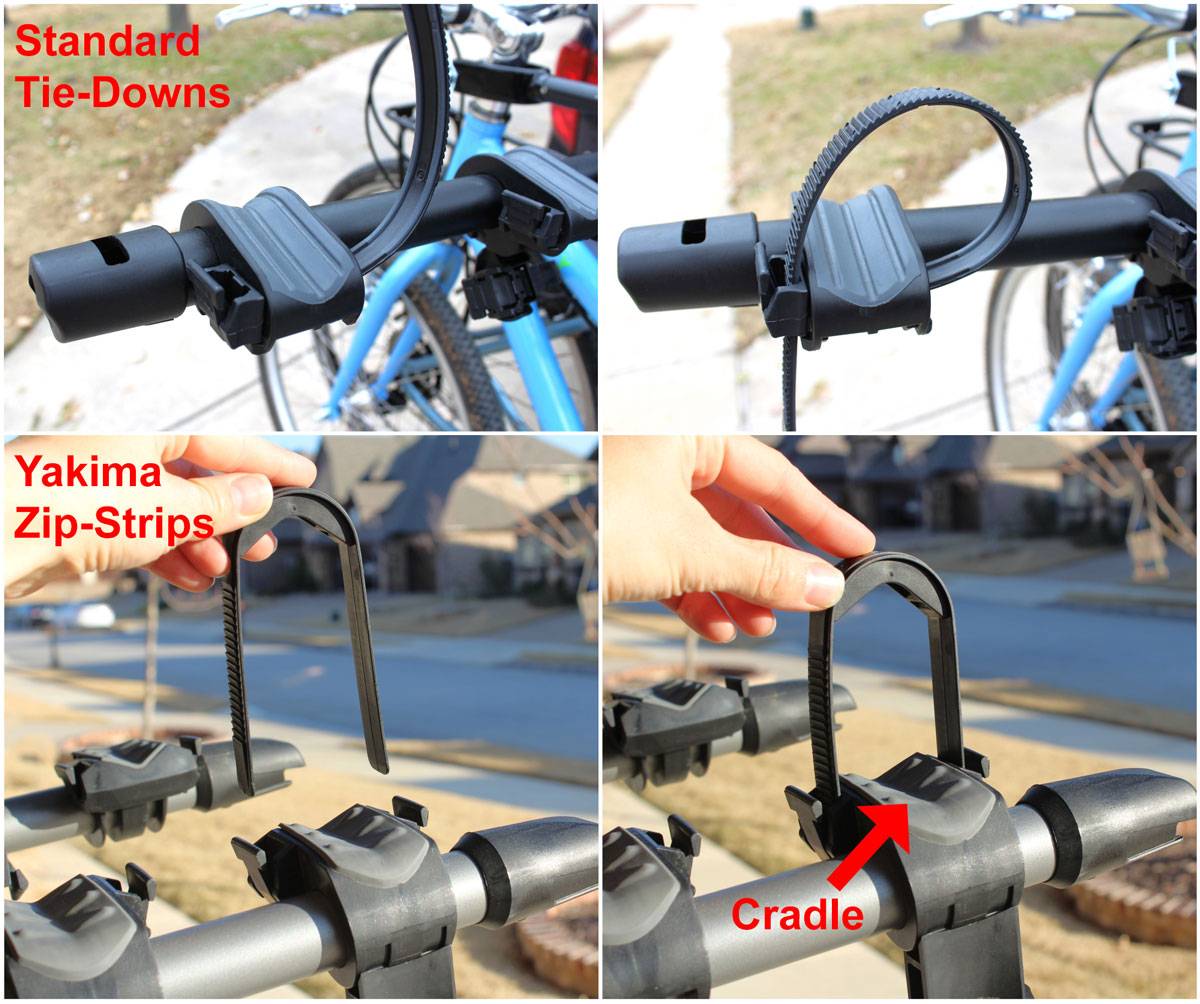
The fully removable zip-strips come off the cradles, allowing the bike frames to slide onto the rack arms with no interference from straps or bulky cradles. Once the bikes’ frames are resting in the cradles, the zip-strips secure the bikes to the rack arms with three points of contact, two on the top tube, and the third on the seat tube which helps prevent the bikes from swaying while you drive.
After the bikes have been secured to the cradles, the front tires of the bikes can be secured to the bike frame with a strap to keep the wheel from turning or spinning while in transport.

Bike Quantity & Spacing
Quantity: The Yakima RidgeBack rack comes in carrier capacities of 2, 4 or 5 bikes with a max weight of 40 pounds allowed for each bike and a total weight of 15o pounds. So if the rack is carrying 5 bikes, they can’t all weigh 40 pounds.
Prior to using the RidgeBack 5 we had been using an Allen 4-bike capacity rack. Getting that fourth bike on the rack was always problematic. When we received the Ridgeback 5-bike carrier I wanted to be able to easily get at least the fourth bike on the rack, and I was hoping for the 5th.
I was excited to see that it was very easy to get the fourth bike on – especially if the middle cradle is empty. Leaving the middle cradle empty means fewer pedals tangled in spokes, fewer handlebars stuck on seats, less damage and scratches on the bikes. The Yakima Ridgeback 5-capacity works great as a 4-capacity bike rack.
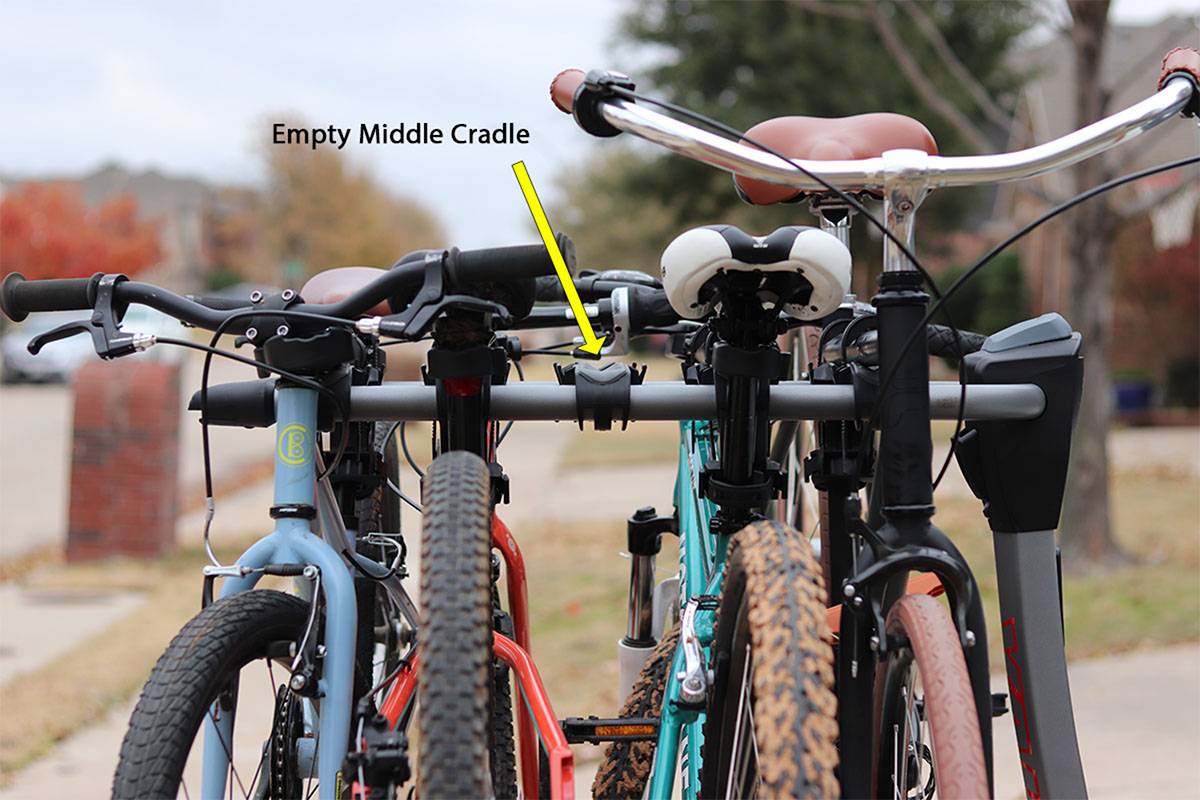
However, to load the rack to its fully advertised capacity of five bikes proved nearly impossible. I wasn’t able to do it, and believe me, I tried A LOT of different bikes and a lot of different configurations.
When it comes to hanging racks, more really is more. If you need to haul three bikes, buy a rack built for four bikes. If you need to haul four bikes, get a five bike carrier. If you need to haul five or six bikes – take two vehicles.
Spacing: The difficulty in fitting five bikes on the 5-bike carrier is a result of the close spacing between cradles. There is actually less space between the cradles on the 5-bike carrier than there is on the 4-bike carrier.
The length between the cradles on the 5-bike capacity is 4.88″ on center, and the 4-bike capacity is 5.5″ apart. This means that it’s going to be harder to put a full load of bikes onto the 5-bike carrier than onto the 4-bike. As a comparison, the similarly priced Thule Apex XT 4-bike has 7″ of space between cradles.

Because the cradles are so close together on the Ridgeback, there is a lot of contact between bikes. While this is just the nature of a hanging bike rack, (especially if you are carrying more than two bikes) the spacing was considerably more congested on the Yakima than on other bike racks we have tested, like the Saris Bones EX 3.

The 20″ bikes are a lot easier to load onto the rack by raising the seat to its maximum height and then using Yakima’s TubeTop adaptor. When the seat height of the bike is raised, it creates more distance between the seat and the head set, which makes it easier to get small-framed bikes onto the rack.
The bigger the frame of the bike, the easier it is to use on a hanging rack. Larger bikes have longer top tubes (the part of the frame that runs between the seat post and the front of the bike), which allows you to slide the bike left and right on the rack arms to avoid contact with other bikes. If you aren’t concerned about securing the anti-sway cradle to the seat tube, this can make configuring the bikes on the rack much easier.
Sliding the bike left and right makes it easier to load consecutive bikes because you can make sure the handlebars of one bike aren’t jamming into the seat or tire of another bike. These jams sometimes make it hard to get the bikes onto the cradles.
The TubeTop Adaptor ($49, not included) comes in handy with step-through frames and kids’ bikes. Because the top tube of a step-through frame slopes steeply downward, often the rack arms won’t fit between the top tube and the down tube, or, if they do, the bike will hang unevenly. Ideally, you want the bikes to hang as level as possible.
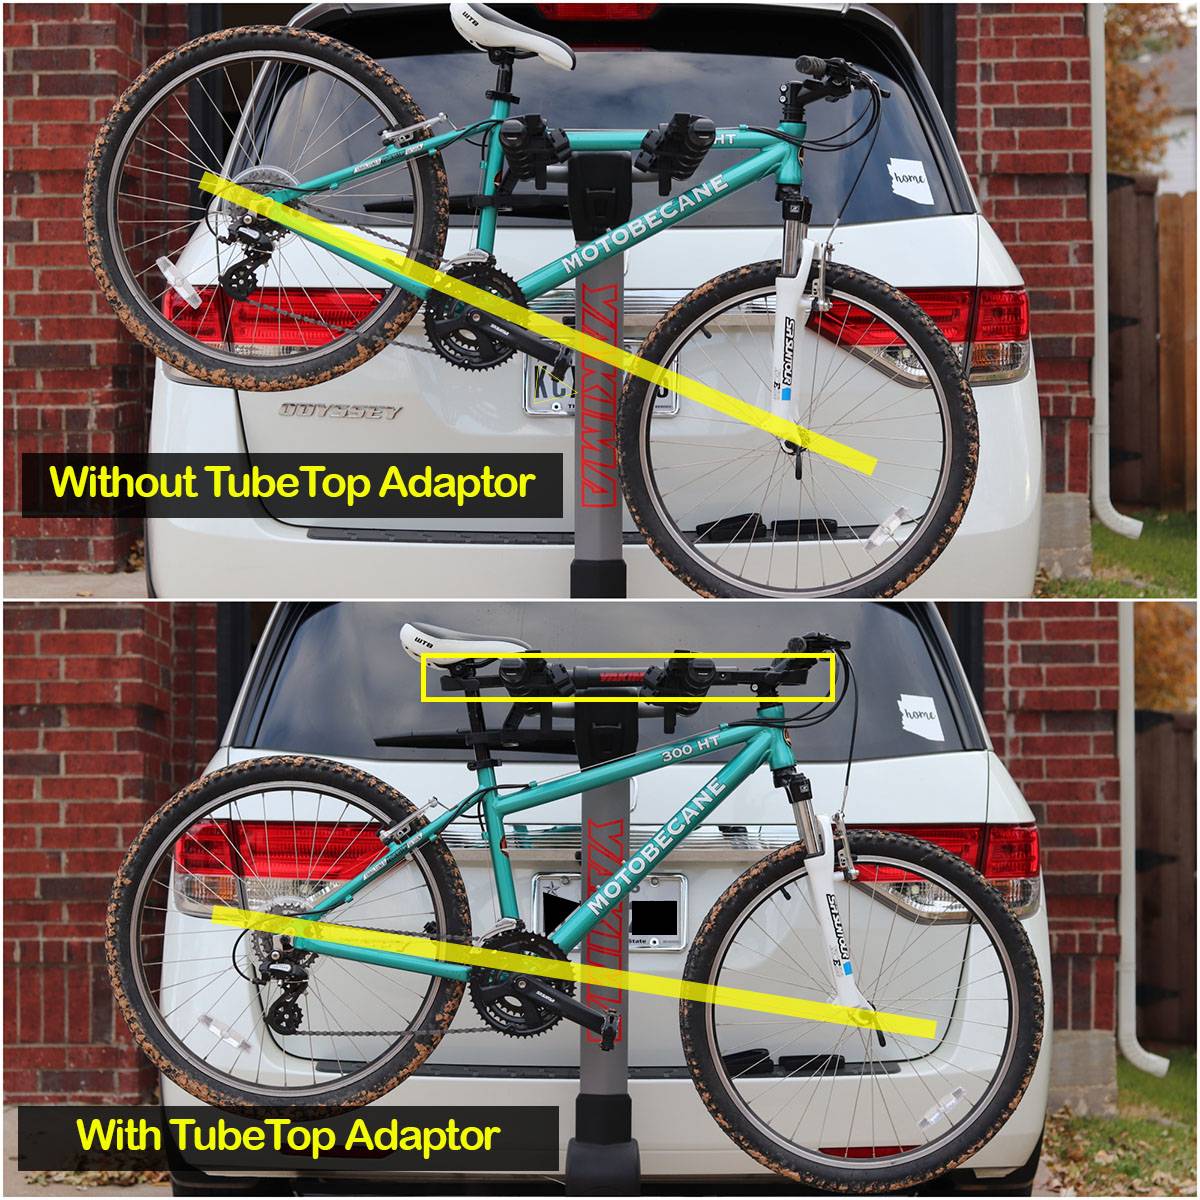
Additionally, an adaptor can make certain bike combinations and configurations fit on the rack a lot more nicely. Sometimes adding the TubeTop to a bike that technically doesn’t need one alters the spacing of the bikes enough for it to be less tricky to fit them all on the rack.
Loading Bikes with the Ridgeback’s Zip Strips
The most unique thing about the Yakima Ridgeback is its Zip-Strip system. Most hanging racks secure bikes by using flexible straps that are made from either fabric or soft rubber; usually the straps are permanently secured to the rack.
The Ridgeback’s Zip Strips are rigid, U-shaped devices that are completely removable from the rack. This means that you can load the bikes without the straps getting in the way or stuck under a bike frame. Each bike uses three zip-strips. Two on the top of the bike’s frame, and one on the anti-sway cradle.
After many outings using the Yakima Ridgeback, we discovered that the easiest and most frustration-free way to load the bikes onto the rack is to remove all the Zip-Strips prior to loading any of the bikes. Once all the bikes are loaded and configured on the rack arms, the Zip-Strips should then be secured in place.

The Zip-Strips are a clever design and work incredibly well with adult bikes with flat top tubes. However, we found the system to be a very tricky to use with women’s bikes and kids’ bikes that require the use of TubeTop adapters.
Here are a few potential issues you may run into with the Zip Strips:
It is difficult to put the Zip-Strips in place when using the TubeTop adaptor.
- The TubeTop adaptor mimics an actual top tube. Most top tubes are significantly lower than the seat’s saddle, so there is plenty of room to fit the rigid Zip-Strips under the saddle and secure the frame to the rack. However, the TubeTop adaptor sits directly beneath the saddle, so the Zip-Strip simply doesn’t fit.

- If the bike’s frame is long enough (most 24″ kids’ bikes and larger), you can actually shift the entire bike frame and TubeTop adaptor forward , put the Zip-Strip in place and lower but not tighten it (see #2 below), shift the bike back next to the anti-sway cradle, and then tighten the Zip-Strip all the way down (#3 below).

- That said, once you have more than two bikes on the rack, shifting the bikes becomes very problematic because the bikes’ handlebars and pedals start blocking each other from moving. In our experience, the time and muscle it took to get one adult bike and three kids’ bikes on the rack was very discouraging.
It is also difficult to put the Zip-Strips in place if your seat is low to your top tube.
- Same issue as above, but you could easily raise your seat for transport.
It’s very tough to get the Zip-Strip into the anti-sway cradle if your tire is close to your seat tube.
- Because the Zip-Strips aren’t flexible, if there’s not enough room to insert it between your tire and the anti-sway cradle, you have a problem.
- One trick we learned was to angle the anti-sway cradle forward and insert the Zip-Strip at an upwards diagonal. Then shift the cradle back down in place agains the bike’s frame and tighten all the way.

It can be difficult to keep track of all the Zip-Strips.
- There are three straps per set of cradles. Because the cradles need to be removed before loading, this means that I have 15 lose parts to keep track of while I’m loading bikes on and off the rack. We’ve been using this rack for a few months now and every time we have used it I have had to go on a hunt to find the missing ZipStrips.

While there certainly are workarounds, these difficulties with the Zip-Strips make the Ridgeback less ideal for carrying more than one bike that needs a TubeTop adaptor.
Folding & Rear Hatch Access
The tilt-away feature on the Ridgeback allows you to easily access the trunk of your car while the rack is still installed on your car. The UpperHand lever on the front of the mast is easy to pull, then the mast smoothly glides down away from the car.
We appreciate that the Ridgeback tilts significantly farther away from the back of the car than other racks we’ve used. I found that this gives me a lot more room to move around when I’m getting gear in and out of the back of my car.

The UpperHand lever also folds the mast forward so that it will fold flat for easy storage; it takes up hardly any space in the garage. The fold-flat feature is also nice if the depth of your garage is on the shorter side. I really like that I can push the mast in closer to my car so that I can walk behind it when I have it parked in the garage.
The arms of the Ridgeback are just as easy to fold up and down. It uses the same kind of lever, but this one is located on the top of the mast. Simply pull the lever and fold the arms up or down. It clicks and locks into place. Some of the less expensive racks use quick release clips (which consist of a pin, a clip, and a wire) to fold the arms and the mast. This lever is much quicker to use and frustration-free.

Ridgeback Additional Features
SpeedKnob: The purpose of the SpeedKnob is two-fold. First, it tightens the hitch in your receiver to remove any wobble. Second, it locks the hitch into your receiver to prevent theft. In our experience with hanging bike racks, the locking feature of the knob has always been somewhat problematic. The locks on all of them seem to be glitchy, but with a little bit of trial and error I’ve always been able to get them to work.
Cradles: The Cradles are stationary a do not rotate around the rack arms like they do on some hitch racks. They have a grey soft rubber bed where the bike sits, preventing damage to pain jobs. Additionally there are raised bumps on the pads that hold the frame up enough to allow clearance for brake and gear cables to pass through so they aren’t being wedged between the frame and the cradle. Each set of cradles also has an anti-sway cradle adding a third point of contact to keep bikes more stationary while you drive.
Bottle Opener: The RidgeBack comes with a bottle opener installed on the ends of both of rack arms. In their own words, “Enjoy a cold one with the Yakima signature bottle opener.” While I’m sure it comes in handy for beverages in a glass bottle, it won’t open my Diet Dr. Pepper (can or bottle).

HandCuff ($49, not included): The HandCuff allows you to lock your bikes to the rack. It comes with an additional lock core to install to the SpeedKnob, enabling you to use the same key for both. There are racks on the market that come with a built in system to lock the bikes to the rack.
Hitch Receiver Compatibility
The Ridgeback works with both 1.25″ and 2″ receivers. This is true for the 2, 4, & 5 bike-carriers. None of the racks are intended for use on trailers, the front of a vehicle, or on RV’s.
The Ridgeback weighs 35.6 lbs. and is significantly heavier and bulkier than the Allen Bike Rack that we reviewed this summer; however, it is still light enough for an average adult to install solo. It’s also on par with Thule’s similar rack.
The additional weight and bulk of the Ridgeback gives me a greater sense of confidence that the bikes will remain secure on the rack while I drive. Because of the heftiness of the Ridgeback I wouldn’t hesitate to take it long distances while fully loaded, which I wasn’t willing to do with the Allen.
Yakima Ridgeback Bike Rack Bottom Line
The Yakima RidgeBack Tilt-Away Hitch Bike Rack is a sturdy piece of equipment that will hold up well to a lot of regular use. Built with high quality materials, you can confidently haul your bikes to faraway destinations knowing that your bikes are secure! Its Zip-Strip tie down system is particularly suited for fast and easy use with bikes with flat top tubes.
For families, however, the combination of the rigid Zip-Strips and the TubeTop adaptors adds a bit of frustration to loading and unloading a family of bikes. While it isn’t as convenient to use as other bike racks on the market, it’s still a top-quality rack.
FTC Disclosure: Affiliate links are included in this review. No monetary compensation was provided for this review, however, the reviewed product was supplied by the manufacturer or distributor to help facilitate this review. All opinions and images are that of Two Wheeling Tots LLC. All content and images are copyrighted and should not be used or replicated in any way. View our Terms of Use.
