Understanding kids helmet sizes is essential to getting a proper fit. Without a proper fit, a helmet cannot completely protect your child’s head like it was designed to do. Kids helmets should NOT flop around on a child’s head, but should stay firmly in place, even when your child is on the move!
You should always have a child wear a properly fitted helmet when riding a bike, skateboard or scooter. If a helmet isn’t the right size, it won’t stay in place and can’t properly protect your child’s head if they crash.
Luckily, kids helmet sizes and getting a great helmet fit are pretty easy to get right if you follow a few simple steps that we’ll guide you through below.
How do Kids Helmet Sizes Work?
Kids helmet sizes have all sorts of names. Toddler, Child, Youth, XS, S, M… Depending on the brand of helmet, the sizes can be called something completely different.
Head Circumference is King!
There is just one thing you really need to focus on – your child’s head circumference. Every helmet, no matter its size, will come with a head circumference range. For example, the Giro Fixture Youth has a range of 50 – 57 cm. If your child’s head circumference falls in that range, the helmet should be a good fit (dependent on head shape, but more on that below).
Need a Bike Helmet Recommendation?
We have the head circumference ranges listed for every helmet we’ve tested! Check out our lists of favorite helmets:
How Should a Bike Helmet Fit?
The right size helmet must also be adjusted properly for a great fit. The following six simple steps will guide you through finding a kids helmet that is just the right size, and then adjusting that helmet so that it stays snuggly on your child’s head to provide them the protection they need.
Visual learner? Let us show you the step-by-step process of properly sizing and adjusting your child bike helmet in our video demonstration. Missed a step? Not to worry, we’ve outlined all of the steps shown in this video below.
6 Easy Steps to Getting a Perfect Helmet Fit
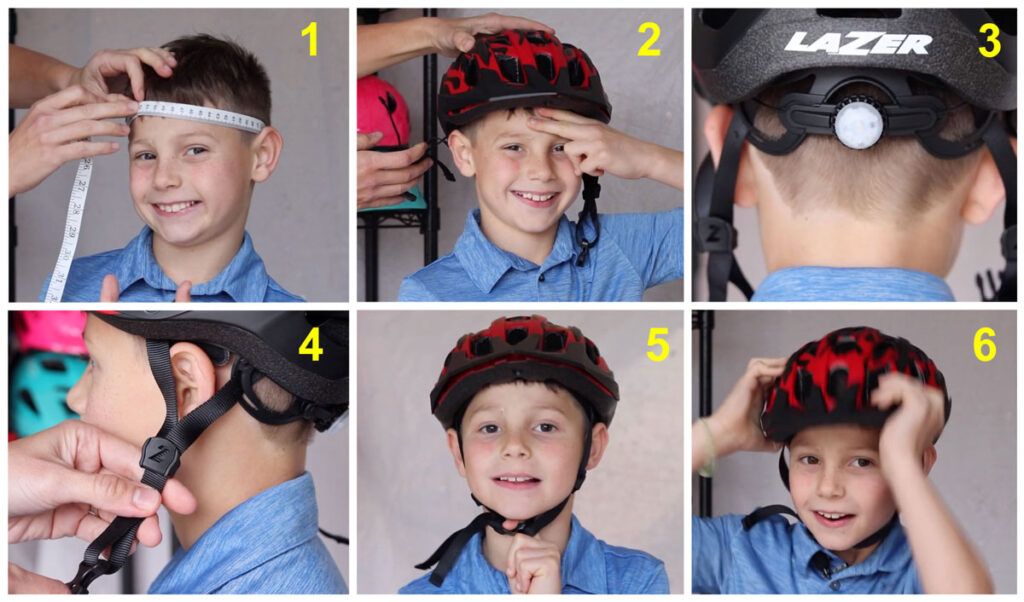
(1) Measure your Child’s Head
You can’t get a helmet to fit well if its not the right size!
- Using a soft tape measure, measure the circumference of the child’s head about an inch above their eyebrows, or the thickest part of their head.
- Compare this measurement to the head size range sticker found on the inside of the helmet. If you’re buying online, the manufacturer should have their size range listed, or check our website!
- Because some kids have narrow heads or wide heads, short foreheads or tall foreheads, not every helmet that should technically fit your child will be a good fit. In our detailed reviews on this site, we discuss the internal shape of individual helmets to help you find a good fit for your child’s unique head shape.
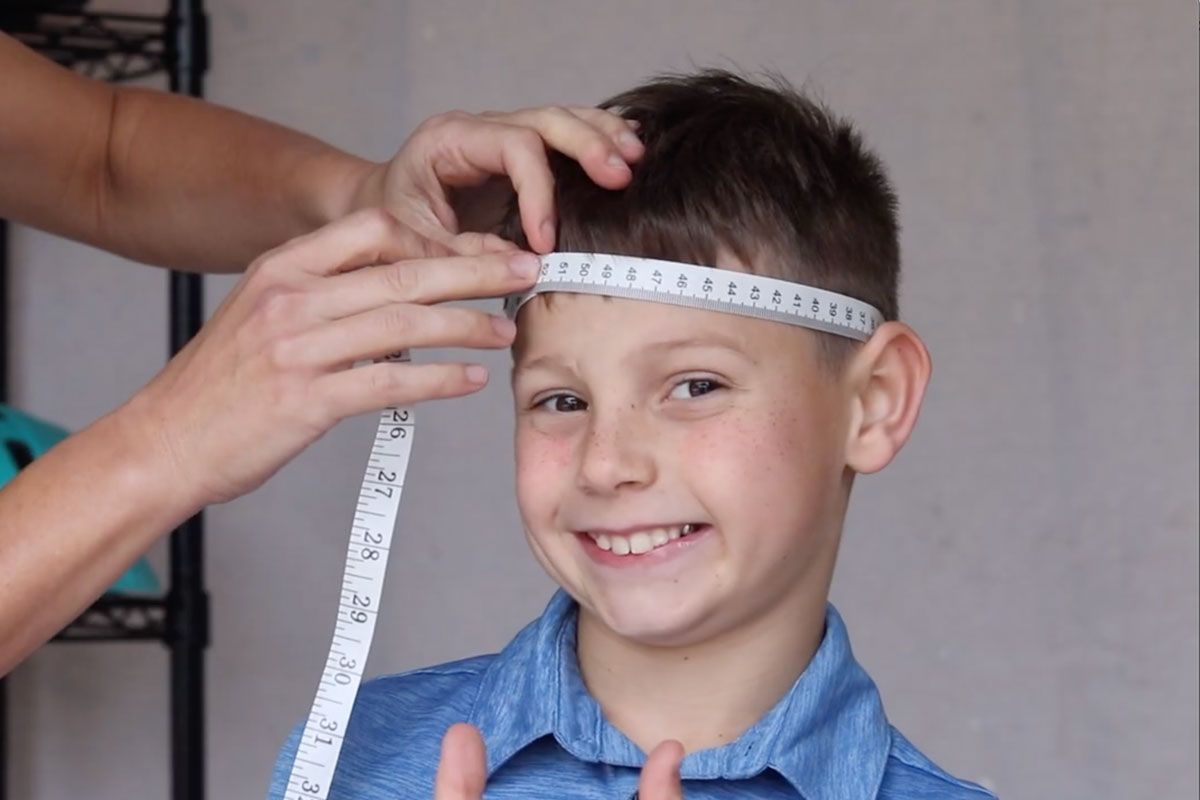
(2) Position the Helmet Just Right
A helmet that is too low or tilted forward can obstruct a child’s view while riding. A helmet that’s too high or tilted back won’t protect a child’s face or forehead sufficiently.
- Remove any thick ponytails or hair clips that may prevent the helmet from sitting flush on a child’s head.
- Place the helmet squarely on top of your child’s head.
- The helmet should sit about two finger widths above the child’s eyebrows.
- TEST: A properly positioned helmet should stick out past the tip of a child’s nose when viewed from the side. You can test this by having your child tap their helmet against the wall.
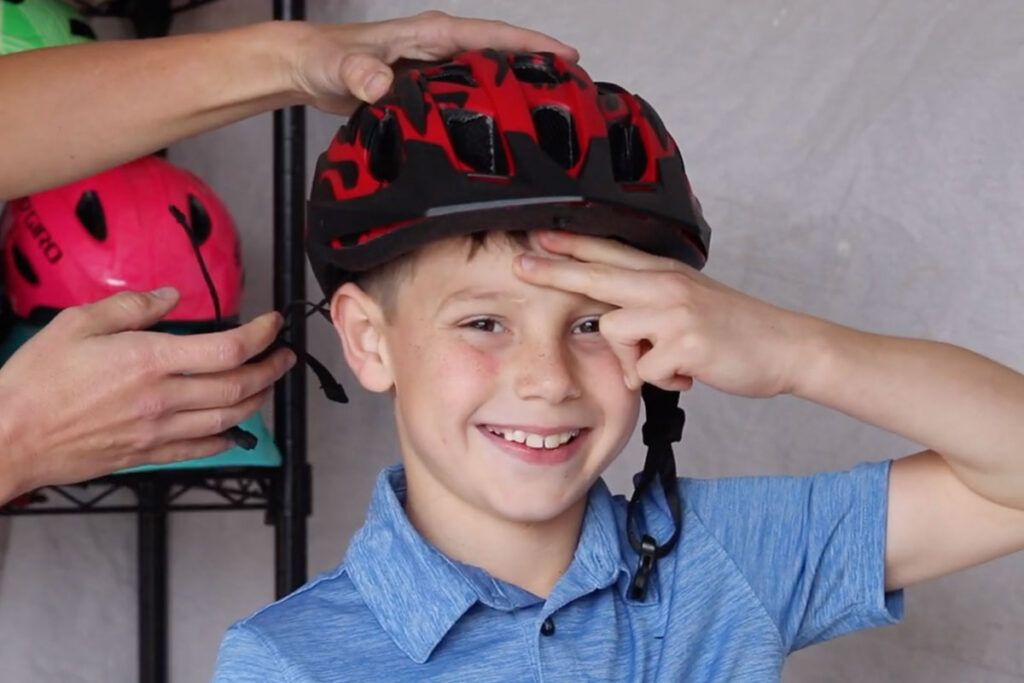
(3) Tighten for a Snug Fit
A helmet should be firmly, but comfortably in place.
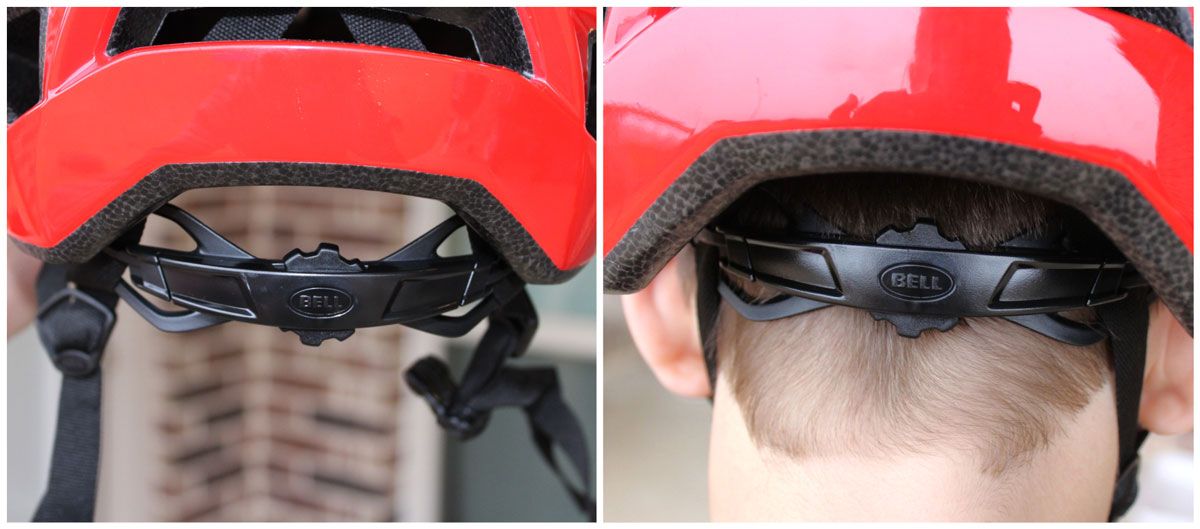
- Once the helmet is sitting correctly on the head, and before you buckle the helmet, tighten the dial-adjust knob on the back of the helmet.
- Turn the knob until the internal cage is snug, but not uncomfortable, on your child’s head.
- If the helmet does NOT have a dial-adjust knob, it should have some pads that come in various widths to widen or tighten the inside of the helmet.
- SHAKE TEST: To check that the helmet is tightened correctly, have your child shake their head back and forth (without it buckled). The helmet should stay firmly in place.
(4) Make a “V” with the Side Straps
Adjusting the sliders on the side straps is required to get a secure fit, but it’s often overlooked. There are a few newer helmets that don’t have these sliders, so if your side straps are sewn together, just don’t worry about this step!
- The sliders should be adjusted so that the straps come together to form a V at the base of the child’s ear.
- This helps keep the helmet centered on the child’s head. A poorly adjusted slider can cause the helmet to slip forward or back on a child’s head while they’re wearing it.
- While some sliders lock into place, most are easily able to slide up and down the side strap. As a result, it’s important to check the position of the sliders regularly.
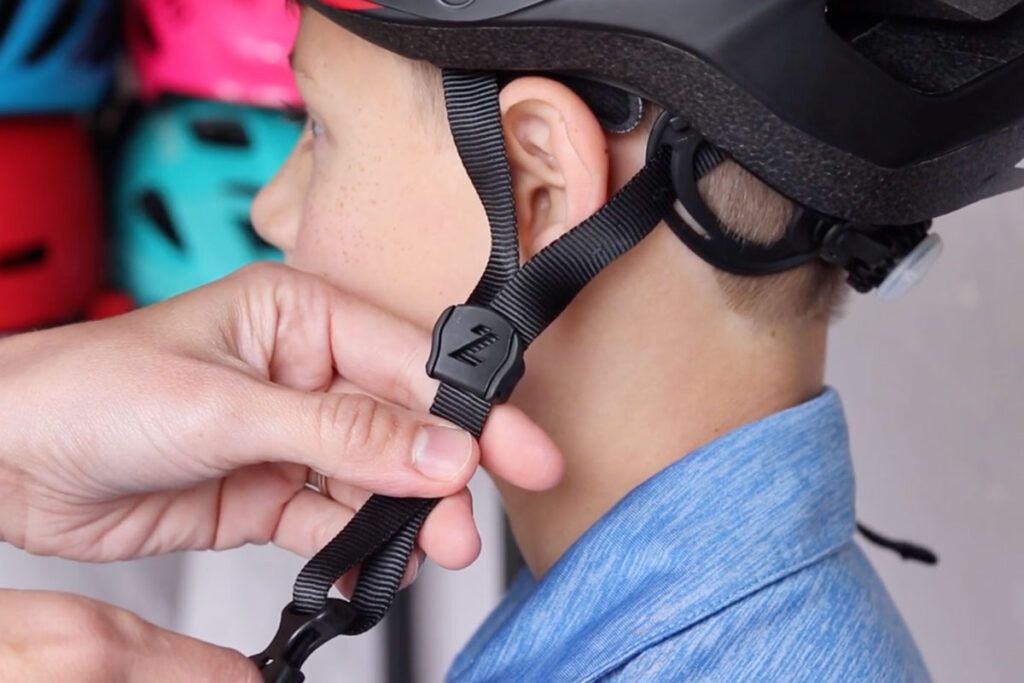
(5) Adjust the Chin Strap for Length

- The chin strap should be loose enough under the chin to allow the child to buckle it, but tight enough that you can fit just one finger between the chin and strap.
- 1 FINGER TEST: Can I fit just one finger between my chin and the strap?
(6) Check Regularly!
- You should check the fit of your child’s helmet every time they ride.
- Adjusting your child’s helmet regularly is just as important as making sure your child is wearing one.
- Helmets quickly and easily come out of adjustment.
Kids Helmets Buying Guide
Making sure you understand kids helmet sizes is clearly the most important factor when buying a kid’s bike helmet. If you buy the wrong size, nothing else matters! But there are many other features of a helmet that make it easier or harder to adjust, and that affect how comfortable it is to wear. There are also specific helmets for biking and scootering or skateboarding. So what else should you look for when choosing a bike helmet?
1. Adjustability – Getting a Tight Fit
Helmet Internal Adjust Systems
To provide a proper fit, any helmet worth buying should have an internal adjustment system. Since the head shapes and sizes of children vary greatly, internal adjustment systems allow the helmet to conform to heads of many sizes, helping the helmet stay in place and better protect the child.
Traditional Dial-Adjust: The most common adjust system is a dial located in the back of the helmet. By turning the dial, the internal cage adjusts to fit a child’s head. Helmets are limited in the amount they can adjust, so it is still vital to purchase the correct size.
Pads Width Adjust: Many skater-style helmets and low-end bicycle style helmets do not come with an adjustment system, but rather different pads of varying thickness. Prior to wearing the helmet, parents are required to insert the thickness of pad necessary to achieve a snug fit. This “adjustment system” is very limited and often results in a poor fit.
Lazer Self-Adjust: Lazer’s unique EZ fit system automatically adjusts to fit the wearer’s head. The system adjusts via tensioned plastic sides that allow the internal cage to stretch to fit a child’s head.
No Adjust: There are a few helmets out there that don’t have any way to adjust the sizing of the helmet. These helmets should be avoided.
Strap Sliders
In addition to the internal-adjust system of a helmet, the strap sliders play an important role in keeping a helmet squarely on a child’s head. To prevent the helmet from tilting forward or back, the side straps on a helmet should come to a “V” right below the child’s ear.
Plastic sliders hold the straps together, allowing them to continue together to the buckle. If not properly placed below the ear, the helmet is much more likely to fall forward or back on a child’s head.

2. Toddler Helmets: Flat Back for Trailers and Child Bike Seats
If you plan on riding with your kids in a trailer or bike seat, a helmet with a flat, smooth back will help to prevent it from sliding forward during a ride. The Giro Scamp is our favorite helmet with a flattened back to prevent a child’s head from being pushed forward in a trailer or seat.

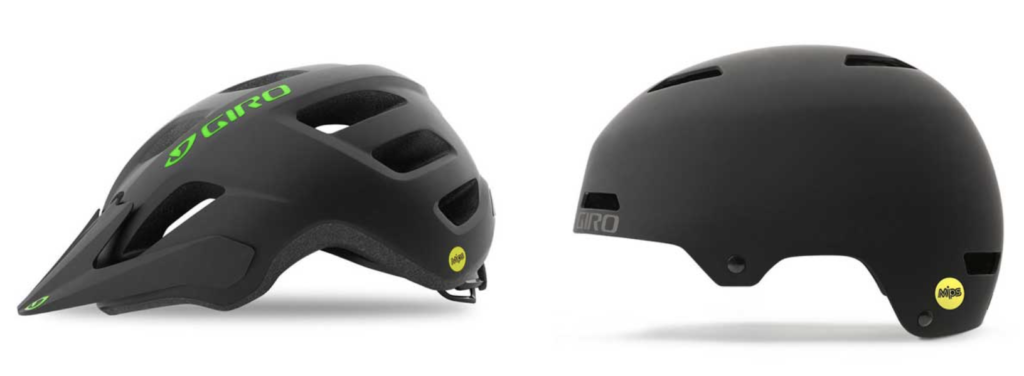
3. Standard Bike Helmets vs. Multi-Sport Skater Style
Skater-style and standard bicycle helmets each have their pros and cons. Traditional bicycle helmets are lighter, have more vents, and are more adjustable, but are not dual-certified and can be harder to fit odd-shaped heads.
Skater helmets are generally heavier, lack a visor, have less vents, and are less likely to have dial-in adjustments, but they also offer more coverage, can be dual-certified (for both biking and skateboarding), and tend to fit odd-sized heads better.
4. Construction – In-mold vs. Hardshell
There are two main types of helmet construction – in-mold and hardshell. Both types of construction provide adequate protection in a crash but vary in durability and style. The main difference between the two types is how the outer plastic protective shell is adhered to the foam core of the helmet.
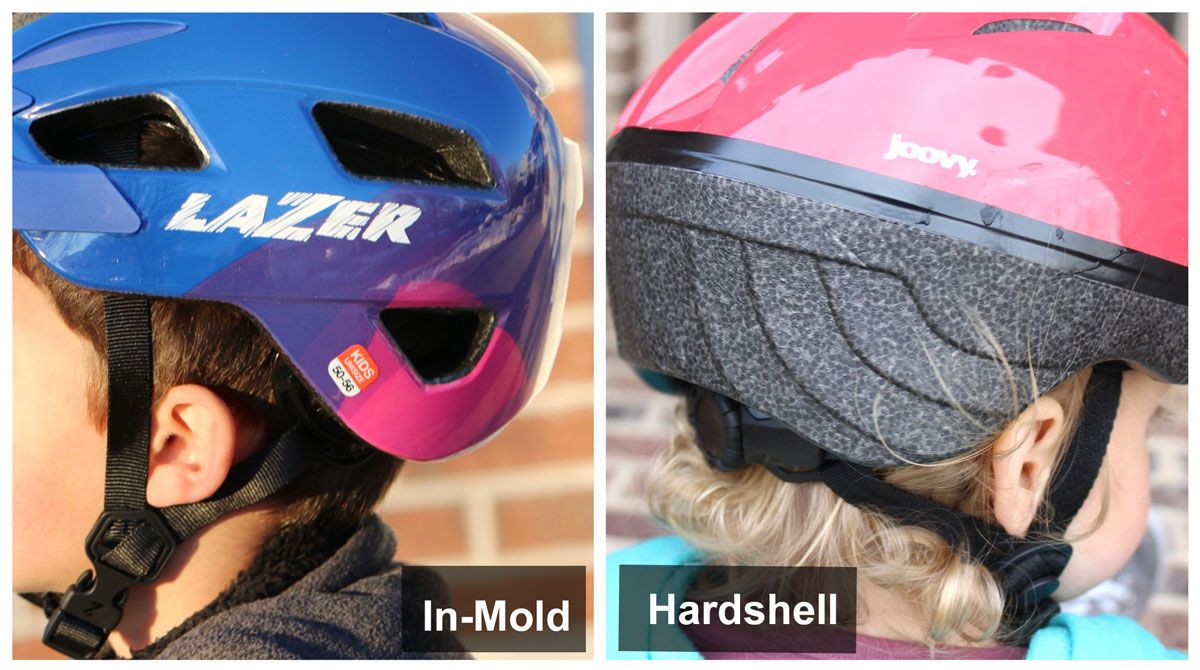
In-Mold: The outer plastic shell and the inner foam core are fused together with in-mold helmets. The fusing process allows for more vents and typically provides for lighter overall weight. The outer plastic shell of the helmet will never crack or come off as it is fused to the foam core. Due to their thinner plastic shell, in-mold helmets cannot be certified for skateboard use by ASTM standards.
Hardshell: There are two main types of hardshell helmets – skater-style and lower-end bicycle helmets. On skater-style helmets, a thick plastic shell is glued to the foam core of the helmet. The thick shell allows for increased durability, multiple impacts for skateboarders, and is required for ASTM skateboarding certification.
On lower-end hardshell helmets, a thin plastic shell is taped onto the foam core. These thin shells easily warp, crack, come off, and offer little durability.
5. Buckle Type – Standard vs. Magnetic
A buckle may not seem like a big deal, but kids that get pinched while trying to fasten a helmet are hesitant to wear them, often leading to unwanted battles with parents. To prevent pinching, several different companies have developed “pinch-free” buckles.

Standard non-pinch buckles consist of a plastic guard underneath the buckle. More advanced systems include the magnetic Fidlock® buckles found on helmets like Nutcase and Thousand, as well as Uvex‘s unique ratcheting buckle.
6. Visors – Sun and Facial Protection
Keeping the sun out of kids’ eyes will certainly make for a more appealing ride. Most traditional bike helmets have built-in or clip-on visors, while most skater-style helmets have no visor.
Built-in visors are common on pre-school helmets as they provide much-needed protection to the face in the event of a face plant. Helmets for youth generally have snap-on visors that are merely for looks and/or limited sun protection.

7. Multiple Impact Protection System – MIPS
MIPS is an additional safety feature offered on several high-end helmets. MIPS stands for Multi-directional Impact Protection System and allows the energy from the crash impact to be absorbed by the helmet regardless of what direction the impact is coming from.
Studies have shown that MIPS can decrease brain injury by 30%. The system consists of a non-obtrusive inner plastic cage that is attached to the foam core with flexible rubber anchors. Upon impact, the anchors stretch, allowing the foam core to rotate around the child’s head. MIPS is available on several brands, including Giro and Nutcase.

While MIPS was the first system of its kind, other helmet brands have since developed their own brain safety systems. Lazer has Kineticore, POC has SPIN, and Kali has QuadCore. There are no test results proving that one system is more effective than another.
8. CSPC/ASTM Safety Certifications
All helmets sold in the US must comply with CPSC (Consumer Product Safety Commission) standards and be labeled with a sticker. All bike helmets sold in the US should be “safe” in terms of providing protection, but only if they are properly fitted and adjusted to a child’s head.
Higher-end helmets tend to offer a better fit and stay in place more securely than low-end helmets, which is why we believe they usually offer better overall protection.
Helmets are certified for specific sports and should only be used for those activities. All helmets that are CPSC certified for biking are also certified for in-line skating and scooters (including low-speed, motor assisted), as well as hoverboards.
BMX riding and downhill mountain biking require a separate level of certification beyond the standard CPSC kid’s biking certificate. All certified bike helmets are required to be labeled with a CPSC sticker. The CPSC does not have a standard sticker, so the design varies from helmet to helmet.
Interested in a dual-certified helmet for skateboarding and biking? Be sure to check out of Best Dual-certified Helmet List.
DUAL CERTIFICATION
ASTM certification is for helmets used for skateboarding and trick roller skating. Skateboarders crash more often and in different ways, so different safety standards are required than for biking.

When shopping for a helmet to be used as a bike helmet and a skateboard helmet, be sure it is CSPC certified as well as ASTM certified for skateboarding. Additional information about CPSC standards can be found here.
BONUS: Head Circumference Chart By Age
Not sure what your child’s head circumference might be? Here’s a chart of the 50th percentile head circumferences by age and gender. This is a general guide that will help as you research kids helmet sizes.
50th Percentile Head Circumference Example Helmets
| Approx. Age | Girl Head Size (cm) | Boy Head Size (cm) | Example |
|---|---|---|---|
|
12 mo. 18 mo. 2 yr. |
45 46.5 47 |
46 47.6 48 |
Giro Scamp |
|
2.5 yr. 3 yr. 3.5 yr. |
48 49 49 |
49 49 50 |
Joovy Noodle |
|
4 yr. 4.5 yr. 5 yr. |
49.5 50 50 |
50.5 51 51 |
woom helmet |
|
6 yr. 7 yr. 8 yr. |
51 52 53 |
52 53 54 |
Giro Fixture |
Related Kids Helmet Articles
10 Best Baby/Toddler Helmets: Our fast and easy list for the littlest noggins.
10 Best Kids Helmets: Our fast and easy top picks list.